Solution Training Case
Hello learner!
In this section, we will create together a solution. Under this link you will find video that shows that process step by step. In every part of that case you will also find Documentation.

Overview
This document is a guide to build a small Profitbase Solution. The idea is that the user should get a basic understanding of how to build a planning solution and the most common features of Profitbase LOW CODE.
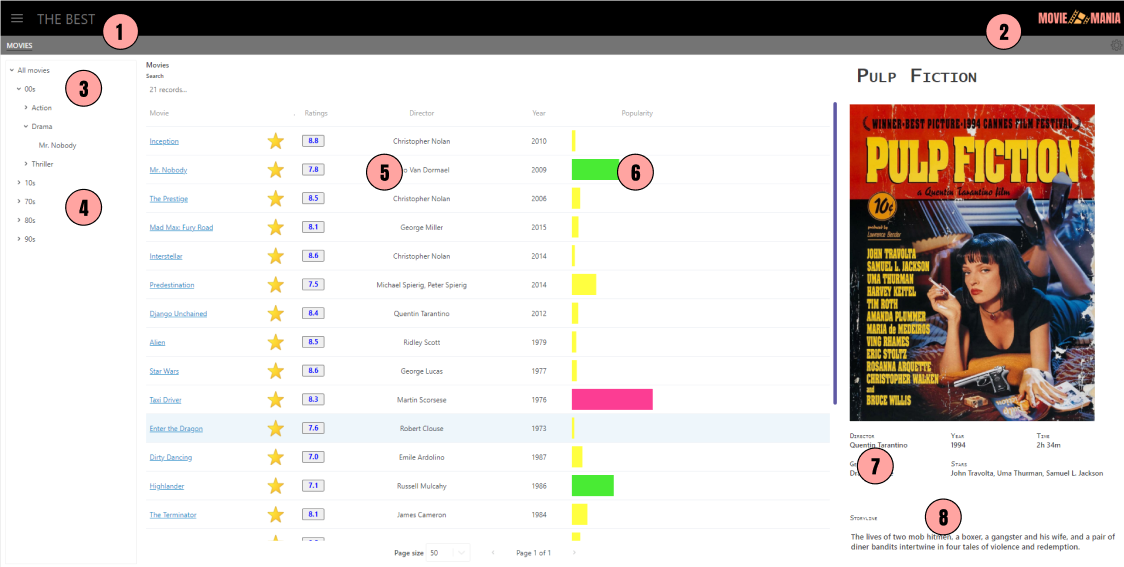
Using this simple example, we want to show you how the Invision LOW CODE can be easy and fun. The goal of this guide is to build a small solution for a movie collection with ranks and short descriptions using many useful components.
1. Creating and setting up the Workbook
In this section you will find instruction on how to create solution, Structure Folders, and setup Access Control.
See also Interface Introduction Video, Access Control Videos.
- Create new solution:
.png)
.png)
- Add page and set up the selected properties:
.png)
- Add your Access Group in Workbook Permissions:
.png)
- Remember to publish your changes:
.png)
2. Themes and styling
In this section you will find instruction on how to change logo and edit System Theme Variables, without using css styles. Here you will find more about Themes and styling.
- Open Assets tab and drop your logo to the Image Library.
.png)
- Open Themes and Styles tab, create new theme, click edit theme images, and find your logo in the dropdown list.
.png)
- Choose your theme for the workbook.
.png)
- You can overwrite System Theme Variables in the Main Theme section. Here you will also find sections for Accesibility and Style Sheets.
.png)
3. Dimension
In this section you will find instruction on how to create a Dimension.
See also Dimension Videos and step by step documentation.
- Right-click on the folder and add a new item.
.png)
- Add columns in the Schema tab.
.png)
- Add or automap Attributes.
.png)
- Create a Hierarchy and add Attributes to it.
.png)
- Add data and Publish.
.png)
4. Filter
In this section you will find instruction on how to create a Filter.
See also Filter Videos, and step by step documentation.
- Right-click on the folder and add a new item.
.png)
- Find a Dimension in the table resources and drag and drop it into the filter container.
.png)
- Find the filter in the resources and place it in the workbook.
.png)
- Set up the Loading event for the Workbook or Page.
.png)
5. Table View
In this section you will find instruction on how to create and customize a Table View.
See also Table View Videos and step by step documentation.
- Right-click on the folder and add a new item.
.png)
- Find the table view in the resources and place it in the workbook.
.png)
- Set up the Loading event for the Workbook or Page.
.png)
- Write a query in the data sourde declaring filter in the first line.
.png)
- Bind the filter in the table view properties.
.png)
- Set up the OnSelectionChanged event for the filter.
.png)
- Add columns in the data grid tab for the table view.
.png)
- Set up properties.
.png)
6. Custom Cell Renderer
In this section you will find instruction on how to customize cells using Custom Cell Renderer. See also Custom Cell Renderer Video and step by step documentation.
- Find column that you want to customize, open renderer window and write your code.
.png)
- To help you we created also some samples that you can use.
.png)
7. Table
In this section you will find instruction on how to create a Table.
See also Table Videos and step by step documentation.
- Right-click the selected folder in the Solution Explorer to add a new item, choose a Table:
.png)
- Add columns by drag and drop or using "Add column" option:
.png)
- Choose the data type:
.png)
- Add the data:
.png)
8. Form Schema
In this section you will find instruction on how to create a Form Schema.
See also Form Schema Videos and step by step documentation.
- Right-click the selected folder in the Solution Explorer to add a new item, choose a Form Schema:
.png)
- Create the Grid:
.png)
- Create a Model and bind it, remember to use the filter property:
.png)
- Style Form Schema with CSS:
.png)
- Add Form Schema to the Workbook:
.png)
- Check "is Action Link Column" box in properties of the Table View column:
.png)
- Add OnTapped event in the in the Table View:
.png)
- Add Load action and SetParamValue to conect the data:
.png)